Ziel: Entwurf einer eigenen Root-CA mit vertrauenswürdigen SSL-Zertifikaten
most-trusted
Friday 4 April 2025
19 versions
Who do you TRUST most? 
Should you consider using self-signed certificate chains when free and widely recognized certificates are readily available?
- Self-signed certificates can be just as secure as publicly trusted certificates.
- They establish a chain of trust, where each party is well-known and directly controlled.
- You have full control of the PKI and the validity of each certificate. No external party can invalidate the certificates.
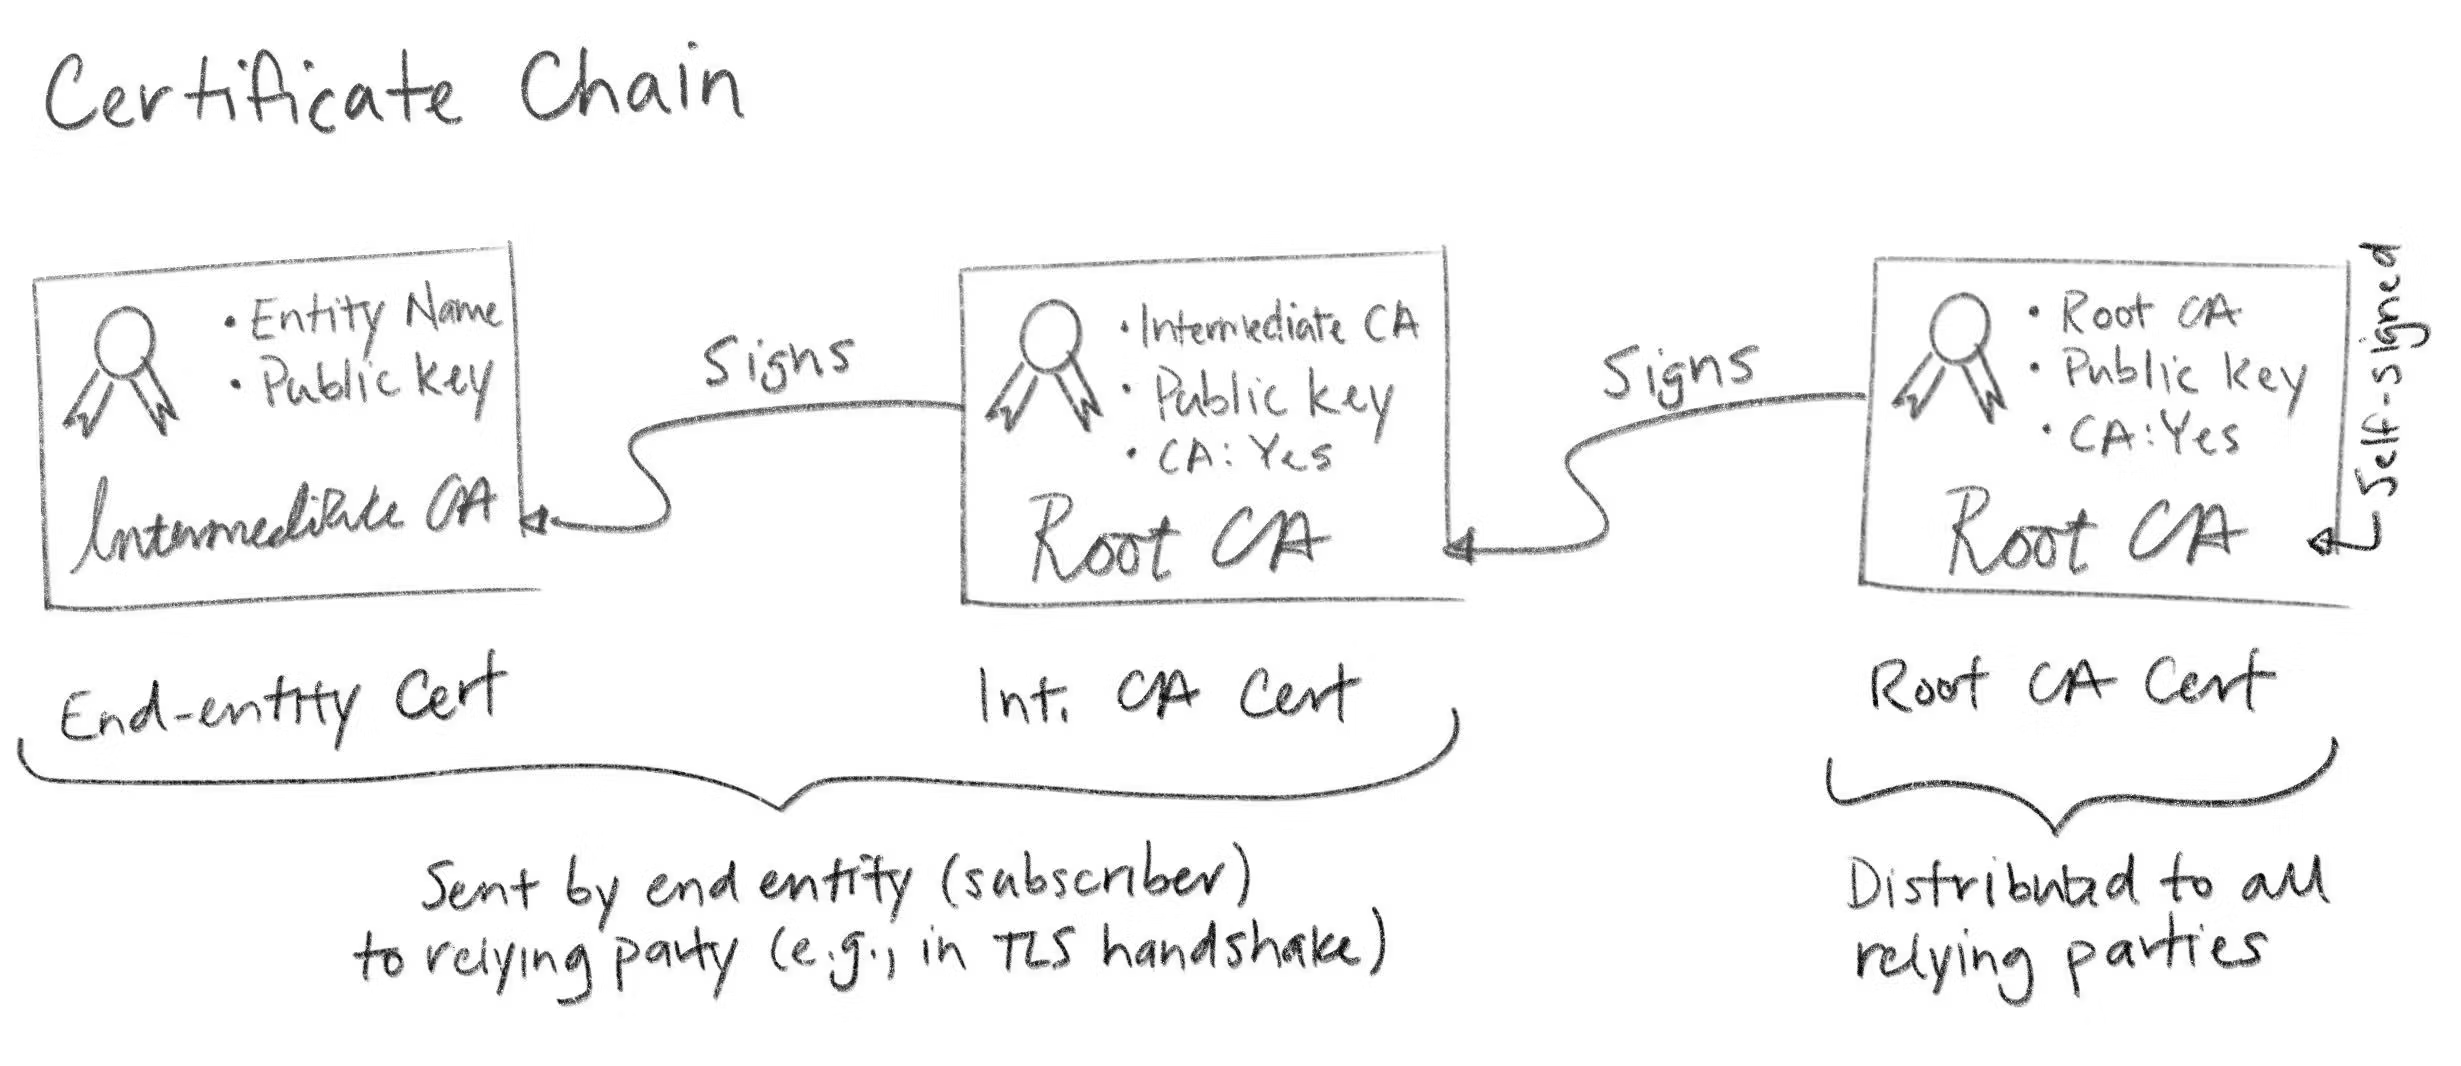
The whole foundation of Web Public Key Infrastructure (PKI) is built upon chains of trust:
“I trust this certificate as it has been issued by a reputable authority that I know I can trust.”
But for internal domains there is really no need to use a public issuer as the domains are accessed in a controlled environment. A good alternative is to roll your own PKI with a private Root Certificate Authority.
Also keep in mind that using a public CA for internal certificates will reveal more of your internal infrastructure, as details will be readily available on sites such ascrt.sh.
Motivation 
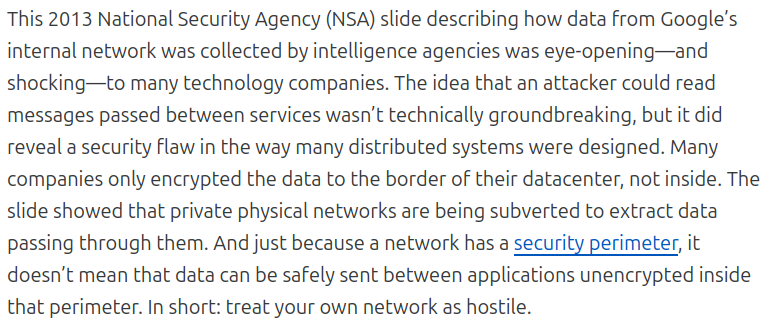
Seit den “Snowden”-Enthüllungen im Jahr 2013 ist klar, dass nur mit einer echten Ende-zu-Ende-Verschlüsselung eine wirklich vertrauliche Datenübertragung in jedem Netzwerk gewährleistet werden kann.
Dazu braucht man diverse Zutaten, wie eine PKI, eine Hierachie von CAs und X.509-Zertifikate die Chains-of-Trust bilden. Dieser Vortrag soll diese Themen näher beleuchten und die praktische Machbarkeit mit bekannten und neuen Open-Source-Tools (z.B.
cfsslodersmallstep) zeigen.

Definitionen 
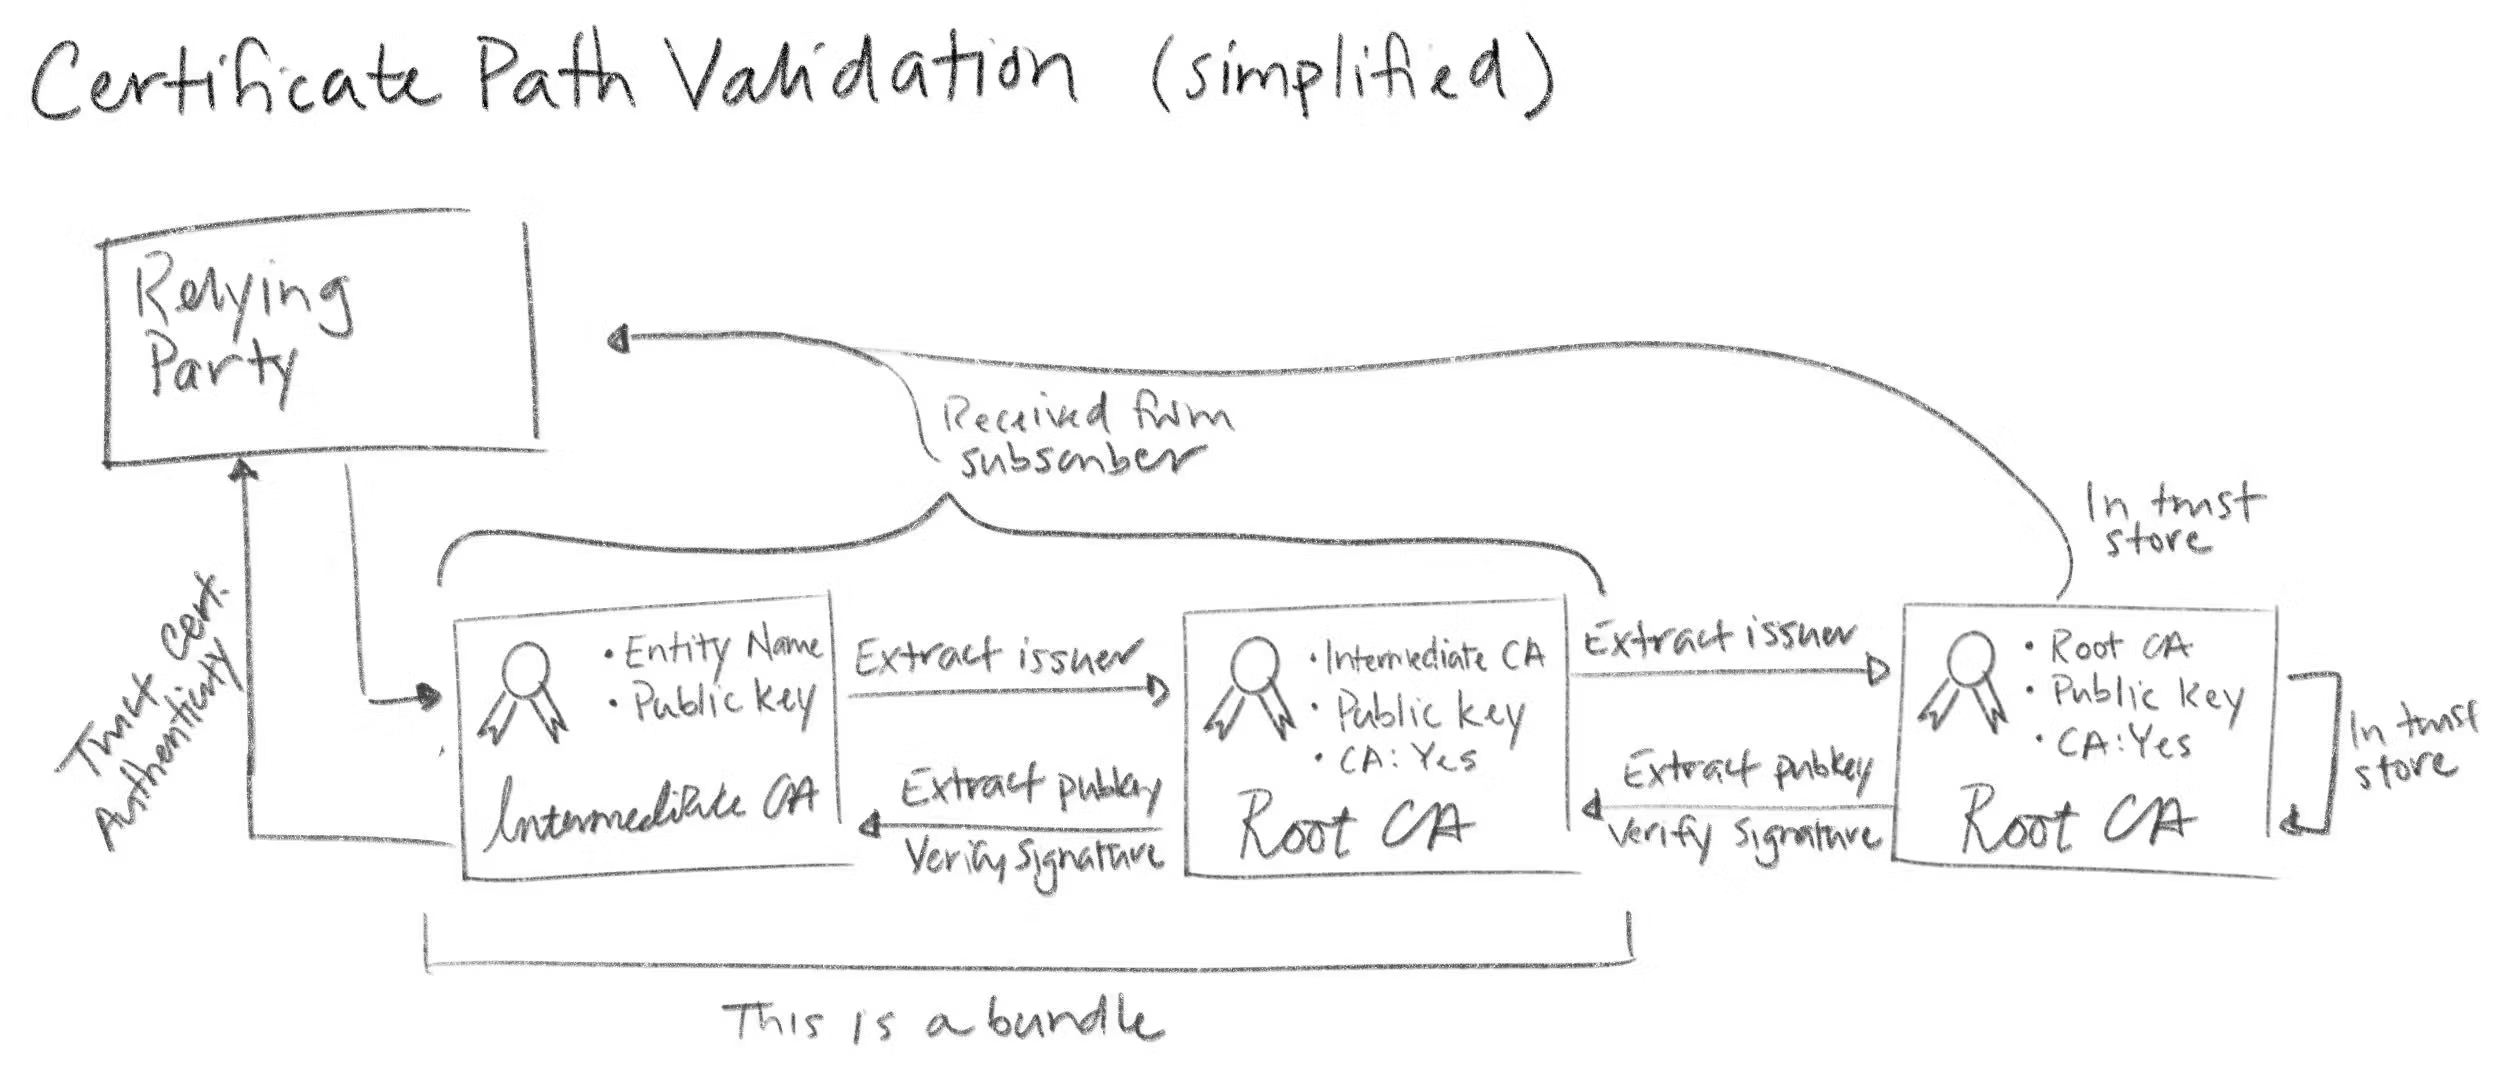
Eine “Public Key Infrastructure” (PKI) ist ein System aus vertrauenswürdigen Zertifizierungsstellen (CAs), die eine hierarchische Vertrauenskette (Chain-of-Trust) bilden, um einem Endgerät und einem Netzwerkserver eine abgesicherte Kommunikation via “Transport Layer Security” (TLS) zu ermöglichen.
TLS (früher SSL) ist die Basis für das HTTPS-Protokoll. Es werden X.509 Zertifikate benutzt, um das Vertrauen zwischen den Kommunikationspartnern herzustellen und danach einen Session-Schlüssel auszutauschen und zu benutzen.
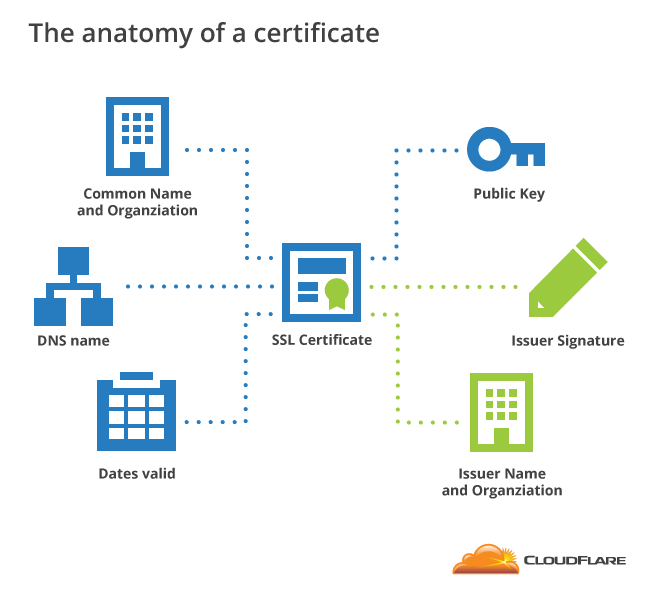
X.509-v3 ist ein ITU-Standard, der das Format von “Public Key Certificates” definiert.
Ein X.509 Zertifikat verknüpft eine Identität mit einem Public Key mittels einer Digital Signature.
X.509 Zertifikate existieren in Base64 Formaten PEM (.pem, .crt, .ca-bundle), PKCS-7 (.p7b, .p7s) und binären Formaten DER (.der, .cer), PKCS-12 (.pfx, .p12).
Die technische Basis für die Erstellung der Public Keys, Private Keys und Digital Signatures ist die asymmetrische Verschlüsselungstechnik. Entweder unter Nutzung des RSA-Algorithmus oder auf Basis von ECC (Elliptic Curve Cryptography). Übersichten über beide Verfahren können hier oder hier eingesehen werden.
Im Blog von Bityard gibt’s eine gute Zusammenfassung und Übersicht zum Thema.
Anleitung von SUSE 
- Internet-Ressourcen: Link zum Artikel und Glossar der Fachbegriffe.
- PDF-Datei zum Herunterladen.
- Als Tool wird
opensslbenutzt.
- Erzeugen von Client Keys, Certificate Signing Requests (CSR) und einer privaten CA.
- Erzeugen von Zertifikaten und Installation von “Certificate Chains” im Linux Trust Store.
Methoden zum Aufbau einer eigenen Certificate Authority und Self-Signed Certificates 
A certificate contains an identity (hostname, organization, etc.) and a public key (RSA, DSA, ECDSA, ed25519, etc.), and is either signed by a Certificate Authority or is Self-Signed.
Werkzeuge für die Kommandozeile 
DER Klassiker: openssl 
Generate CA 
- Generate RSA key
1openssl genrsa -aes256 -out ca-key.pem 4096
- Generate a public CA Cert
1openssl req -new -x509 -sha256 -days 365 -key ca-key.pem -out ca.pem
View Certificate’s content 
1openssl x509 -in ca.pem -text
2openssl x509 -in ca.pem -purpose -noout -text
Generate Certificate 
- Create an RSA key
1openssl genrsa -out cert-key.pem 4096
- Create a Certificate Signing Request (CSR): specify the identity as
subjector common name.
1openssl req -new -sha256 -subj "/CN=yourcn" -key cert-key.pem -out cert.csr
- Create an
extfilewith all the SANs (subject alternative names)
1echo "subjectAltName=DNS:your-dns.record,IP:257.10.10.1" >> extfile.cnf
2# optional
3echo "extendedKeyUsage = serverAuth" >> extfile.cnf
- Let the CA create the signed certificate
1openssl x509 -req -sha256 -days 365 -in cert.csr -CA ca.pem -CAkey ca-key.pem \
2  -out cert.pem -extfile extfile.cnf -CAcreateserial
Convert Certificates 
| COMMAND | CONVERSION |
|---|---|
openssl x509 -outform der -in cert.pem -out cert.der |
PEM to DER |
openssl x509 -inform der -in cert.der -out cert.pem |
DER to PEM |
openssl pkcs12 -in cert.pfx -out cert.pem -nodes |
PFX to PEM |
Verify Certificates 
1openssl verify -CAfile ca.pem -verbose cert.pem
Alternatives PKI-Tool von OpenVPN: easy-rsa 
Easy-rsa ist ein Shell-Skript und Frontend für openssl.
- Tool und Quellcode können von Github heruntergeladen werden.
- Da ich keine Erfahrung damit habe, wird deshalb hier nur die Existenz erwähnt.
cfssl von Cloudflare macht’s einfacher 
Cfssl ist ein Tool von Cloudflare aus dem Jahr 2014, welches ohne die Verwendung von openssl auskommt.
- Syntax und Kommando-Optionen sind einfacher zu verstehen.
- Tool und Quellcode können von Github heruntergeladen werden.
- Ergänzende Blog-Artikel aus 2015 und 2016 erläutern weitere Details des Toolsets.
Da die offizielle Dokumentation von
cfssletwas dürftig ist, sind diese privaten Blog-Artikel sehr hilfreich!
Private-Key und CSR Dateien für einen Webservice erstellen 
- Spezifikation für den CSR als JSON-Datei erstellen. Dabei gleich alle SANs (“Subject Alternate Names”) in den Abschnitt “hosts” einfügen. Das können sowohl DNS-Namen (FQDN) als auch IP-Adressen sein.
 1{
 2  "CN": "my-service.fqdn.tld",
 3  "key": {
 4    "algo": "ecdsa",
 5    "size": 256
 6  },
 7  "names": [
 8    {
 9      "C": "DE",
10      "ST": "RLP",
11      "L": "Ludwigshafen",
12      "O": "AG MicroComputer",
13      "OU": "Pagong"
14    }
15  ],
16  "hosts": [
17    "my-service.fqdn.tld",
18    "10.12.13.14"
19  ]
20}
- Public und Private KEY für den CSR erstellen und von JSON- in’s PEM-Format wandeln.
 1$ cfssl genkey my-service-csr.json | cfssljson -bare my-service
 22025/03/21 15:14:28 [INFO] generate received request
 32025/03/21 15:14:28 [INFO] received CSR
 42025/03/21 15:14:28 [INFO] generating key: rsa-2048
 52025/03/21 15:14:28 [INFO] encoded CSR
 6
 7$ ls -l
 8-rw-r--r-- 1 pagong users 1155 Mar 21 15:14 my-service.csr
 9-rw-r--r-- 1 pagong users  322 Mar 21 15:08 my-service-csr.json
10-rw------- 1 pagong users 1679 Mar 21 15:14 my-service-key.pem
11
12$ cfssl certinfo -csr my-service.csr
- CSR Datei von (irgend)einer CA unterschreiben lassen. Damit erhält man die signierte CRT Datei.
- z.B. von
openssloderstep-caoderOPNsense - oder auch von
cfssl: siehe nächster Abschnitt
- Fertiges Zertifikat (CRT-Datei) anzeigen.
1$ cp my-service.pem my-service.crt
2$ cfssl certinfo -cert my-service.crt
Signieren eines CSR von einer CA = Ausstellen eines Zertifikats (CRT) für einen Webservice 
- Lokales Signieren
1$ cfssl gencert -ca my-ca.pem -ca-key my-ca-key.pem my-service-csr.json |
2    cfssljson -bare my-service
- Remote Signieren
1$ cfssl gencert -remote=remote_server my-service.csr.json |
2    cfssljson -bare my-service
- Fertiges Zertifikat (CRT-Datei) anzeigen.
1$ ls my-service*
2my-service.csr
3my-service-csr.json
4my-service-key.pem
5my-service.pem
6
7$ cp my-service.pem my-service.crt
8$ cfssl certinfo -cert my-service.crt
- Beim
cfssl signVorgang kann auch noch eine JSON-Konfigurationsdateicfssl-cfg.jsonmit Profile-Definitionen genutzt werden, um das “Finetuning” des Verwendungszwecks (oder anderer Parameter) des Zertifkats anzupassen.
1$ cfssl sign -config cfssl-cfg.json -profile profile_name \
2  -ca ca.pem -ca-key ca-key.pem my-service.csr |
3    cfssljson -bare my-service
Eigene Root-CA erstellen 
Dieses Beispiel wurde von Rob Blackbourn übernommen.
- Spezifikation für die CA als JSON-Datei erstellen.
 1{
 2  "CN": "Custom Widgets Root CA",
 3  "key": {
 4    "algo": "rsa",
 5    "size": 4096
 6  },
 7  "names": [
 8  {
 9    "C": "GB",
10    "L": "London",
11    "O": "Custom Widgets",
12    "OU": "Custom Widgets Root CA",
13    "ST": "England"
14  }
15 ]
16}
- Public und Private KEY für die CA erstellen. Die Root-CA ist daran erkennbar, dass sie selbst signiert ist.
(Also Issuer = Owner bzw. Subject).
1$ cfssl genkey -initca root-ca-csr.json |
2    cfssljson -bare root-ca
3
4$ ls root-ca*
5root-ca.csr
6root-ca-csr.json
7root-ca-key.pem
8root-ca.pem
- PEM- in CRT-Datei kopieren und Zertifikat anzeigen.
1$ cp root-ca.pem root-ca.crt
2$ cfssl certinfo -cert root-ca.crt
Eigene (intermediate) Branch-CA erstellen 
Dieses Beispiel wurde ebenfalls von Rob Blackbourn übernommen.
- Spezifikation für den CSR der Branch-CA als JSON-Datei erstellen.
 1{
 2  "CN": "Custom Widgets Branch CA",
 3  "key": {
 4    "algo": "rsa",
 5    "size": 2048
 6  },
 7  "names": [
 8    {
 9      "C":  "GB",
10      "L":  "London",
11      "O":  "Custom Widgets",
12      "OU": "Custom Widgets Branch CA",
13      "ST": "England"
14    }
15  ],
16  "ca": {
17    "expiry": "42720h"
18  }
19}
- Public und Private KEY für den CSR der Branch-CA erstellen. Dabei entsteht auch eine nicht benötigte PEM-Datei.
1$ cfssl gencert -initca branch-ca-csr.json |
2    cfssljson -bare branch-ca
- Und den CSR gleich von der Root-CA signieren lassen. Dabei wird die ‘unnötige’ durch die ‘richtige’ PEM-Datei ersetzt.
1$ cfssl sign -config cfssl-cfg.json -profile branch_ca \
2  -ca root-ca.pem -ca-key root-ca-key.pem branch-ca.csr |
3    cfssljson -bare branch-ca
4
5$ ls branch-ca*
6branch-ca.csr
7branch-ca-csr.json
8branch-ca-key.pem
9branch-ca.pem
- PEM- in CRT-Datei kopieren und Zertifikat anzeigen.
1$ cp branch-ca.pem branch-ca.crt
2$ cfssl certinfo -cert branch-ca.crt
Eigene Leaf-CA erstellen 
Dies erfolgt ähnlich zum Vorgang der Signierung der Branch-CA durch die Root-CA. Nur wird in diesem Fall die Leaf-CA durch die Branch-CA signiert.
- Spezifikation für den CSR der Leaf-CA als JSON-Datei erstellen.
 1{
 2  "CN": "Custom Widgets Leaf CA",
 3  "key": {
 4    "algo": "ecdsa",
 5    "size": 384
 6  },
 7  "names": [
 8    {
 9      "C":  "GB",
10      "L":  "London",
11      "O":  "Custom Widgets",
12      "OU": "Custom Widgets Leaf CA",
13      "ST": "England"
14    }
15  ],
16  "ca": {
17    "expiry": "8760h"
18  }
19}
- Public und Private KEY für den CSR der Leaf-CA erstellen. Dabei entsteht auch eine nicht benötigte PEM-Datei.
1$ cfssl gencert -initca leaf-ca-csr.json |
2    cfssljson -bare leaf-ca
- Und den CSR gleich von der Branch-CA signieren lassen. Dabei wird die ‘unnötige’ durch die ‘richtige’ PEM-Datei ersetzt.
1$ cfssl sign -config cfssl-cfg.json -profile leaf_ca \
2  -ca branch-ca.pem -ca-key branch-ca-key.pem leaf-ca.csr |
3    cfssljson -bare leaf-ca
4
5$ ls leaf-ca*
6leaf-ca.csr
7leaf-ca-csr.json
8leaf-ca-key.pem
9leaf-ca.pem
- PEM- in CRT-Datei kopieren und Zertifikat anzeigen.
1$ cp leaf-ca.pem leaf-ca.crt
2$ cfssl certinfo -cert leaf-ca.crt
Verwendung von KEY und CRT Dateien 
Umwandeln von KEY- und CRT-Dateien zu Kubernetes secrets zur Verwendung in einem mit TLS abgesicherten Web-Service.
1$ CRT="$SRCDIR/my-service.crt"
2$ KEY="$SRCDIR/my-service.key"
3$ kubectl -n my-namespace  create secret tls  my-service-tls  --cert="$CRT" --key="$KEY"
4$ kubectl -n my-namespace  describe secret  my-service-tls
Grafische Werkzeuge 
Firewall OPNsense (GUI im Web-Browser) 
OPNsense ist eine Firewall-Software, die auf FreeBSD basiert. Neben der Aufgabe als Firewall können damit über Plugins auch viele andere Netzwerk-Dienste (u.A. DNS, DHCP, NTP, VPN, etc.) eingerichtet und verwaltet werden.
- Download von OPNsense als ISO-Datei
- Link zur Online-Dokumentation
OPNsense enthält Plugins, die ein grafisches Frontend zu openssl und ACME bieten:
-
HowTo “Setup Self-Signed Certificate Chains”
- etwas einfacher zu Bedienen als die Kommandozeile
- aber ohne Hintergrundwissen zu X.509 bleibt’s schwierig
-
Online-Artikel zur Nutzung von OPNsense als CA:
-
Online-Blog-Artikel zum Plugin
acme-client: -
Links zur Online-Dokumentation von OPNsense:
- Kapitel “Trust”
- Details zum Plugin-API
acmeclient - Details zum Core-API
trust
Windows 
Im MatrixPost-Blog wird die Nutzung der PKI Möglichkeiten in Windows Server gezeigt.
| THEMA | LINK |
|---|---|
| PKI Design | Part 1 |
| Offline Root CA | Part 2 |
| Intermediate CA | Part 3 |
| Client Certificates | Part 4 |
| Auto Enrollment | Part 5 |
Automationswerkzeuge 
Zertifikate für Kubernetes: cert-manager 
Der cert-manager wird für das automatisierte Anfordern und Erneuern von Zertifikaten in Kubernetes-Clustern benutzt.
- Umfangreiche Dokumentation und Source-Code bei Github.
- Installation erfolgt über ein Helm-Chart.
Neuentdeckung: Open Source PKI Smallstep 
Während der Vorbereitung dieses Vortrags bin ich auf ein “YouTube”-Video und Blog gestossen, in welchem Open-Source-Tools der Firma Smallstep zum Aufbau einer privaten CA benutzt wurden:
Bei der weiteren Recherche habe ich dieses Dokument des Firmengründers Mike Malone gefunden. Dort werden alle Eigenschaften von X.509v3-Zertifikaten und deren Life-Cycle klar und präzise erläutert:
Step-CA 
Server-Tool:
- Dokumentation] zum Tool
step-cazum Betreiben einer Certificate Authority CA. - Download des Source-Codes und der Software-Pakete von Github
- Betrieb als Linux-Daemon oder im Docker-Container möglich
Step CLI 
Client-Tool:
- Dokumentation zum CLI-Tool
stepzum Anfordern und Verwalten von Zertifikaten aller Art. - Download des Source-Codes und der Software-Pakete von Github
Beispiele 
Diese Artikel im Smallstep-Blog werden als Basis und Inspiration für meine Experimente dienen.
- “Run your own private CA & ACME server using step-ca” (als PDF)
- “Build a Tiny Certificate Authority For Your Homelab” (als PDF)
ACME: Automated Certificate Management Environment 
Let’s Encrypt 
Das Projekt “Let’s Encrypt” hat zum Ziel, dass alle Web-Seiten und sämtlicher Internet-Traffic nur noch in verschlüsselter Form (per TLS-Protokoll) übertragen werden.
- Früher waren die dafür benötigten Zertifikate recht teuer und konnten zusammen mit einer DNS-Domäne gekauft werden. (Achtung: ABO-Modell!)
- Es gibt aber DynDNS-Provider, die einer Hobby-Seite Zugang zu einer kostenlosen DNS-Domäne ermöglichen. Und seit es “Let’s Encrypt” gibt (also seit 2015), werden auch die dazu passenden X.509-Zertifikate kostenlos ausgestellt.
Zur Überprüfung, dass ein Webseiten-Betreiber tatsächlich die Kontrolle über den FQDN der Webseite hat, wurde das ACME-Protokoll eingeführt, welches “Domain-Validation” DV benutzt:
- Auf Anfrage durch den ACME-Client erzeugt der ACME-Server eine zufällige Information, die der Client auf einer speziellen HTTP-Unterseite der Webseite (oder als TXT-Record im DNS-System) veröffentlicht.
- Im nächsten Schritt überprüft der ACME-Server die HTTP-Unterseite (oder den TXT-Record). Falls dort die gleiche Zufallsinformation gefunden wird, die er vorher dem ACME-Client gesendet hat, kann er davon ausgehen, daß der Client echt ist. Mit anderen Worten: die Domäne ist validiert.
- Zum Schluss stellt der ACME-Server ein zeitlich befristetes Zertifikat (meist 90 Tage) für die DNS-Domäne des ACME-Clients aus, welches für die Übertragung der per TLS verschlüsselten HTTPS-Seiten des Web-Servers genutzt wird.
- Vor Ablauf der Frist muss sich der ACME-Client wieder an den ACME-Server wenden und um die Zertifikats-Verlängerung (d.h. Austellung eines ‘frischen’ Zertifikats) bitten.
- Laut “Heise”-Newsticker arbeitet “Let’s Encrypt” an der Verkürzung der Zertifkats-Gültigkeit von 90 auf 6 Tage.
- Die Trump-Regierung stoppt die Förderung von Open-Source-Projekten, wie “Let’s Encrypt”, “TOR” und “F-Droid”.
SmallStep ACME 
Both step and step-ca are natively integrated with the ACME protocol. step can be used to request ACME certificates from any ACME server, while step-ca is a fully functional private ACME server that works with all popular ACME clients.
Zero-SSL 
Im “Caddy” Webserver ist, anstelle von “Let’s Encrypt”, der Zertifikatsprovider “Zero-SSL” automatisch aktiviert.
Andere ACME-Clients 
Certbot 
Certbot is EFF’s tool to obtain certs from “Let’s Encrypt”. It’s written in Python.
It can also act as a client for any other CA that uses the ACME protocol.
LEGO 
Let’s Encrypt/ACME client and library written in Go.
acme.sh 
A pure Unix shell script implementing ACME client protocol.

Eigene Root-CA in Betriebssystemen verankern 
On SUSE 
- Copy the CA certificate (
My-CA.pem) or (My-CA.crt) to/etc/pki/trust/anchors/ - Now run:
1sudo update-ca-certificates
Refer to documentation here and here. See also Blog post.
On Fedora 
- Copy the CA certificate (
My-CA.pem) to/etc/pki/ca-trust/source/anchors/or/usr/share/pki/ca-trust-source/anchors/ - Now run:
1sudo update-ca-trust
Refer to documentation here. See also Blog post.
On Debian & Derivatives 
- Copy the CA certificate (
My-CA.pem) or (My-CA.pem) into/usr/local/share/ca-certificates/. - Update the Cert Store with:
1sudo update-ca-certificates
Refer to documentation here and here.
On Arch 
System-wide – Arch(p11-kit)
(From arch wiki)
- Run (as root)
1trust anchor --store My-CA.crt
- The certificate will be written to /etc/ca-certificates/trust-source/My-CA.p11-kit and the “legacy” directories automatically updated.
- If you get “no configured writable location” or a similar error, import the CA manually:
- Copy the certificate to the
/etc/ca-certificates/trust-source/anchors/directory. - and then
1sudo update-ca-trust
wiki page here
See also:
On Windows 
Assuming the path to your generated CA certificate as C:\My-CA.pem, run:
1Import-Certificate -FilePath "C:\My-CA.pem" -CertStoreLocation Cert:\LocalMachine\Root
- Set
-CertStoreLocationtoCert:\CurrentUser\Rootin case you want to trust certificates only for the logged in user.
OR
In Command Prompt, run:
1certutil.exe -addstore root C:\My-CA.pem
certutil.exeis a built-in tool (classicSystem32one) and adds a system-wide trust anchor.
Siehe auch “Step 4 – Import root certificate to users devices” im Kapitel “openssl” bzw. den “Step 5” im Kapitel “cfssl” in einer anderen Fundstelle.
For Windows:
1mmc
- Click Open
- Go to File > Add/Remove Snap-in
- Click Certificates and Add
- Select Computer Account and click Next
- Select Local Computer then click Finish
- Click OK to go back to the MMC window
- Double-click Certificates (local computer) to expand the view
- Select Trusted Root Certification Authorities, right-click on Certificates, and select “All Tasks” then “Import”
- Click Next then Browse. Change the certificate extension dropdown next to the filename field to “All Files (.)” and locate the “your-root-cert-name.pem” file, click “Open”, then “Next”
- Select “Place all certificates in the following store”. “Trusted Root Certification Authorities store” is the default. Click “Next” then click “Finish” to complete the wizard
- To verify, see your imported root certificate if it’s listed in the list of root certificates
Auch im “Proxmox”-Wiki gibt es einen Artikel zum Hinzufügen von Zertifikaten zum Windows Trust-Store.
On macOS 
Assuming the path to your generated CA certificate is ~/My-CA.pem, run (as root):
1security add-trusted-cert -d -r trustRoot -k /Library/Keychains/System.keychain ~/My-CA.pem
A dialog box will appear asking for an administrator’s username and password. Enter it, and it will be stored in the system keychain. This can be verified by opening the Keychain Access application (/Applications/Utilities/Keychain Access.app). On the sidebar under System Keychains select System, and the new certificate should be listed.
Siehe auch “Step 4 – Import root certificate to users devices” im Kapitel “openssl” bzw. den “Step 5” im Kapitel “cfssl” in einer anderen Fundstelle.
For MAC OS:
- Open up Keychain Access by searching it on Spotlight (clicking the Magnifying glass located on the upper right corner)
- Select File > Import Items. Find the generated root certificate. Select System as “Destination Keychain”
- Enter password when prompted
- Logoff to take effect
Auch im “Proxmox”-Wiki gibt es einen Artikel zum Hinzufügen von Zertifikaten zum Trust-Store von macOS.
Eigene Root-CA in mobilen Geräten verankern 
On Android 
The exact steps vary device-to-device, but here is a generalised guide:
- Open Phone Settings
- Locate
Encryption and Credentialssection. It is generally found underSettings > Security > Encryption and Credentials - Choose
Install a certificate - Choose
CA Certificate - Locate the certificate file
My-CA.pemon your SD Card/Internal Storage using the file manager. - Select to load it.
- Done!
- “Importing SSL Certificate on Android or iPhone” TitanHq
On iOS 
Apple makes this far more difficult than it should be:
- Send
My-CA.pemto the iOS device through iCloud, AirDrop, or a direct download from your server. - After downloading a dialog will appear on screen telling you that the profile has been downloaded.
- Open the Settings app, and a
Profile Downloadeditem will be at the top. If it is not there, you may find it inGeneral → VPN & Device Management. - Click
Install. - The device will ask for your passcode. Enter it.
- The device will then warn you about the certificate. Click
Installagain. - And, as if clicking
Installtwice wasn’t enough, a confirmation button will appear at the bottom of the screen. ClickInstallone last time. - Done!
- “Importing SSL Certificate on Android or iPhone” TitanHq
Eigene Root-CA in Web-Browser integrieren 
Browser: Firefox 
Tipps von Mozilla:
- “Set up Certificate Authorities (CAs) in Firefox” im Mozilla Support
(enthält Tipps für Windows und macOS und Android und Linux) - You can do that in the Certificate Manager:
“Tools > Options > Advanced > Certificates: View Certificates”
To import a client certificate to Firefox, open the menu and select Preferences.
Navigate to the Certificates tab and click View Certificates, then Your Certificates, and finally, Import.
Locate your PKCS12 file (.p12 or .pfx), enter the password, and confirm the import.
Your certificate will appear under Your Certificates in Firefox Certificate Manager.
- Im “Proxmox”-Wiki gibt es einen Artikel zum Hinzufügen von Zertifikaten zum Trust-Store von Firefox.
- “Howto import your certificate to the browser” der “World Intellectual Property Organization” WIPO
- “Import Certificate to Mozilla Firefox” keyfactor
- “Importing SSL Certificate in Mozilla Firefox” TitanHq
Browser: Chrome für Linux 
Viele Quellen sagen, dass “Chrome” (und “Edge”, etc.) den Trust-Store des Betriebssystems nutzen!
Install Root Certificates on Chrome running on Linux 
For Linux, Chrome uses its own certificate store. You can import your Root CAs in Chrome directly.
In Chrome open Settings –> Privacy and security –> Security –> Manage certificates –> Authorities
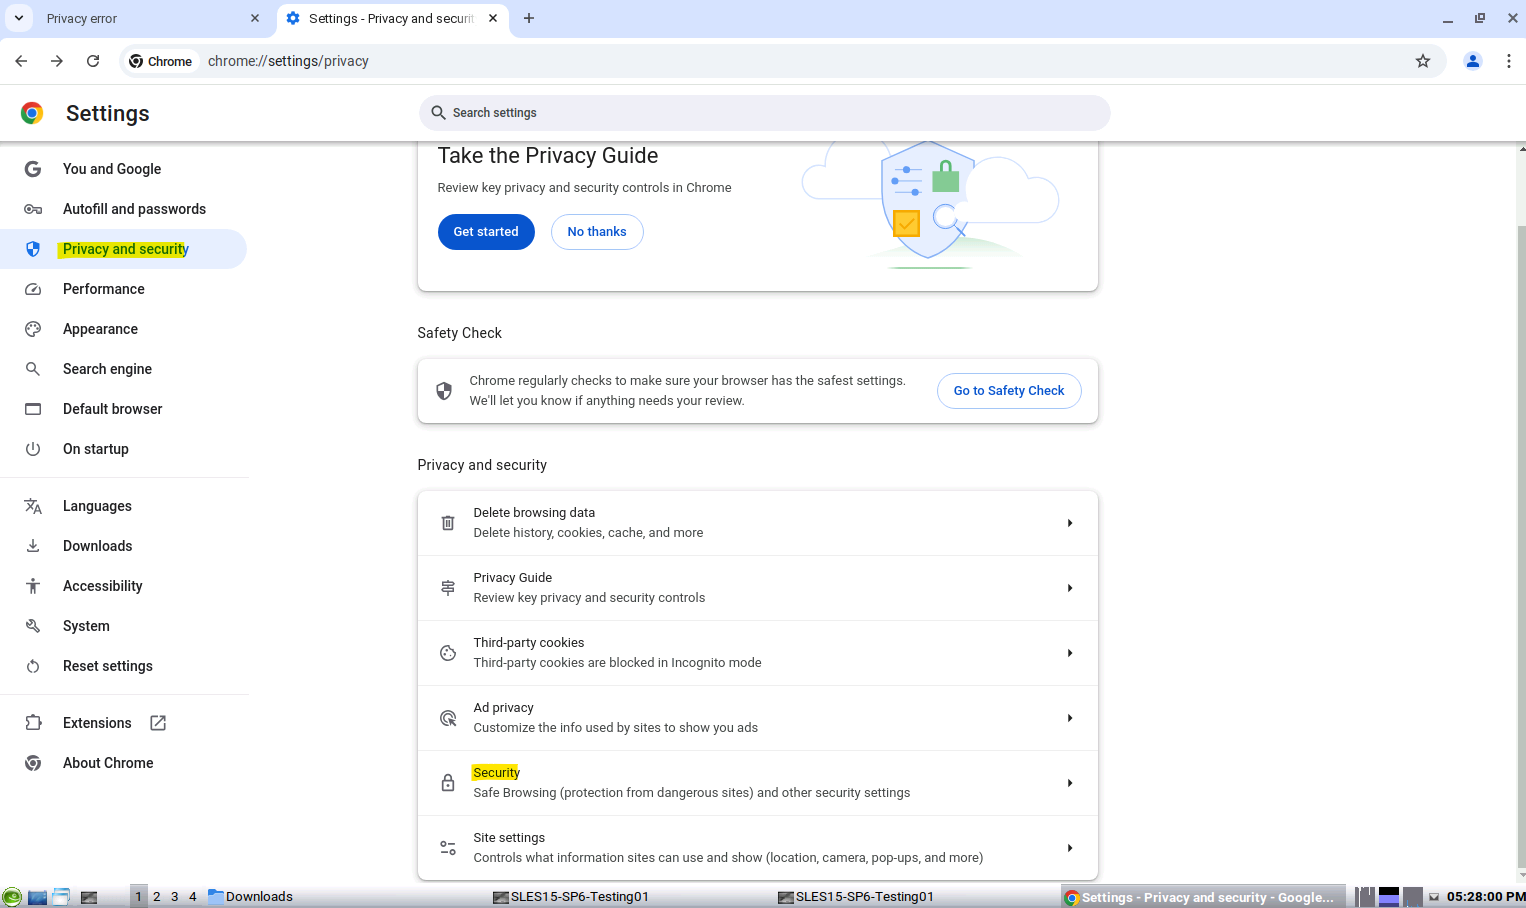

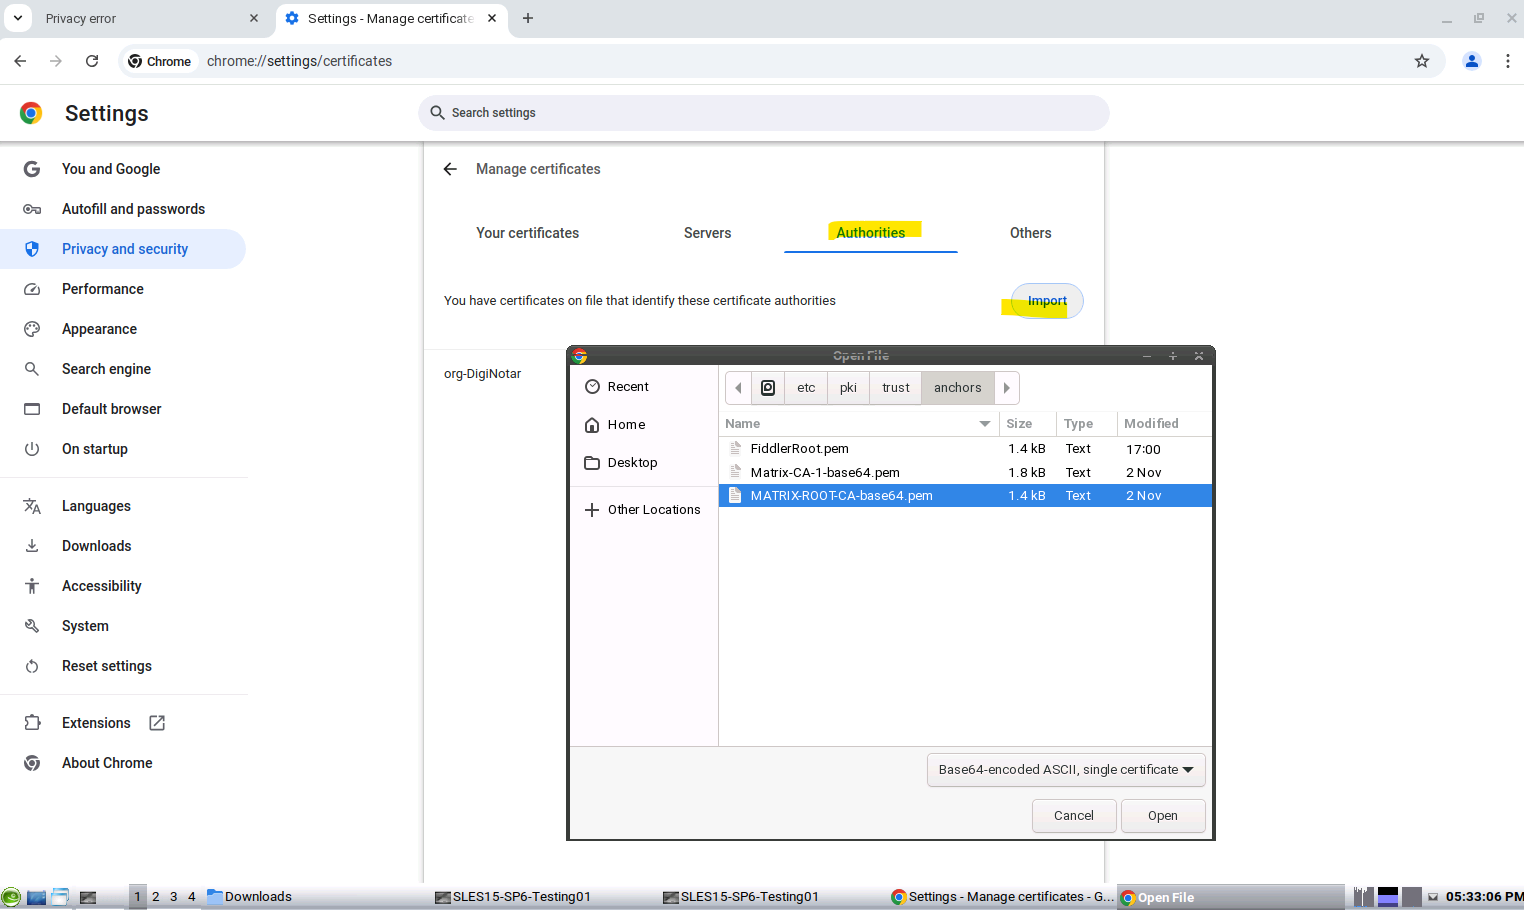
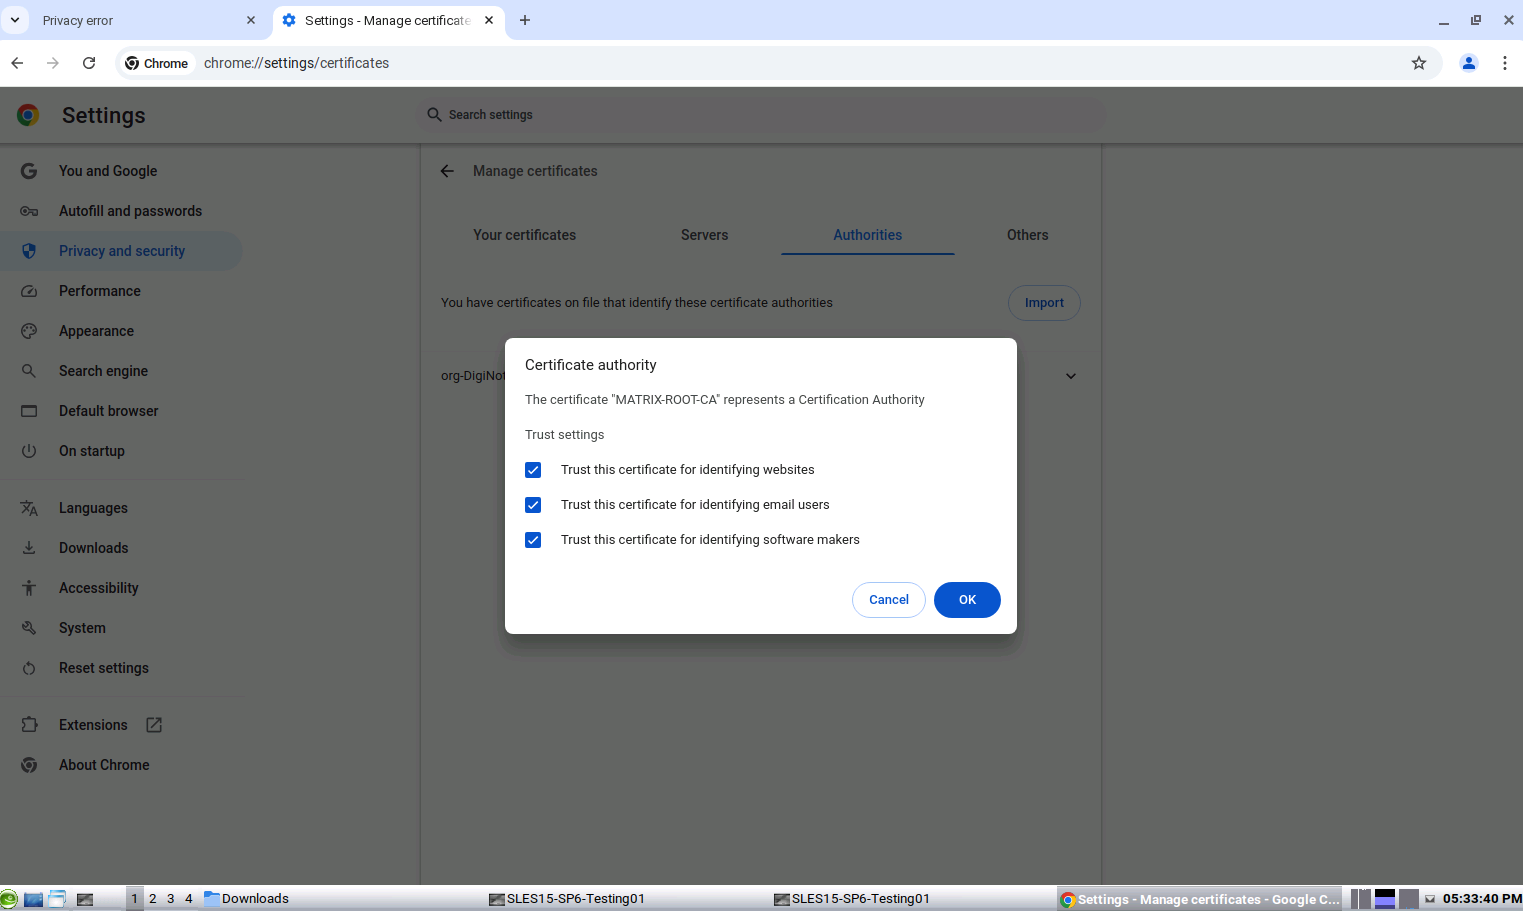
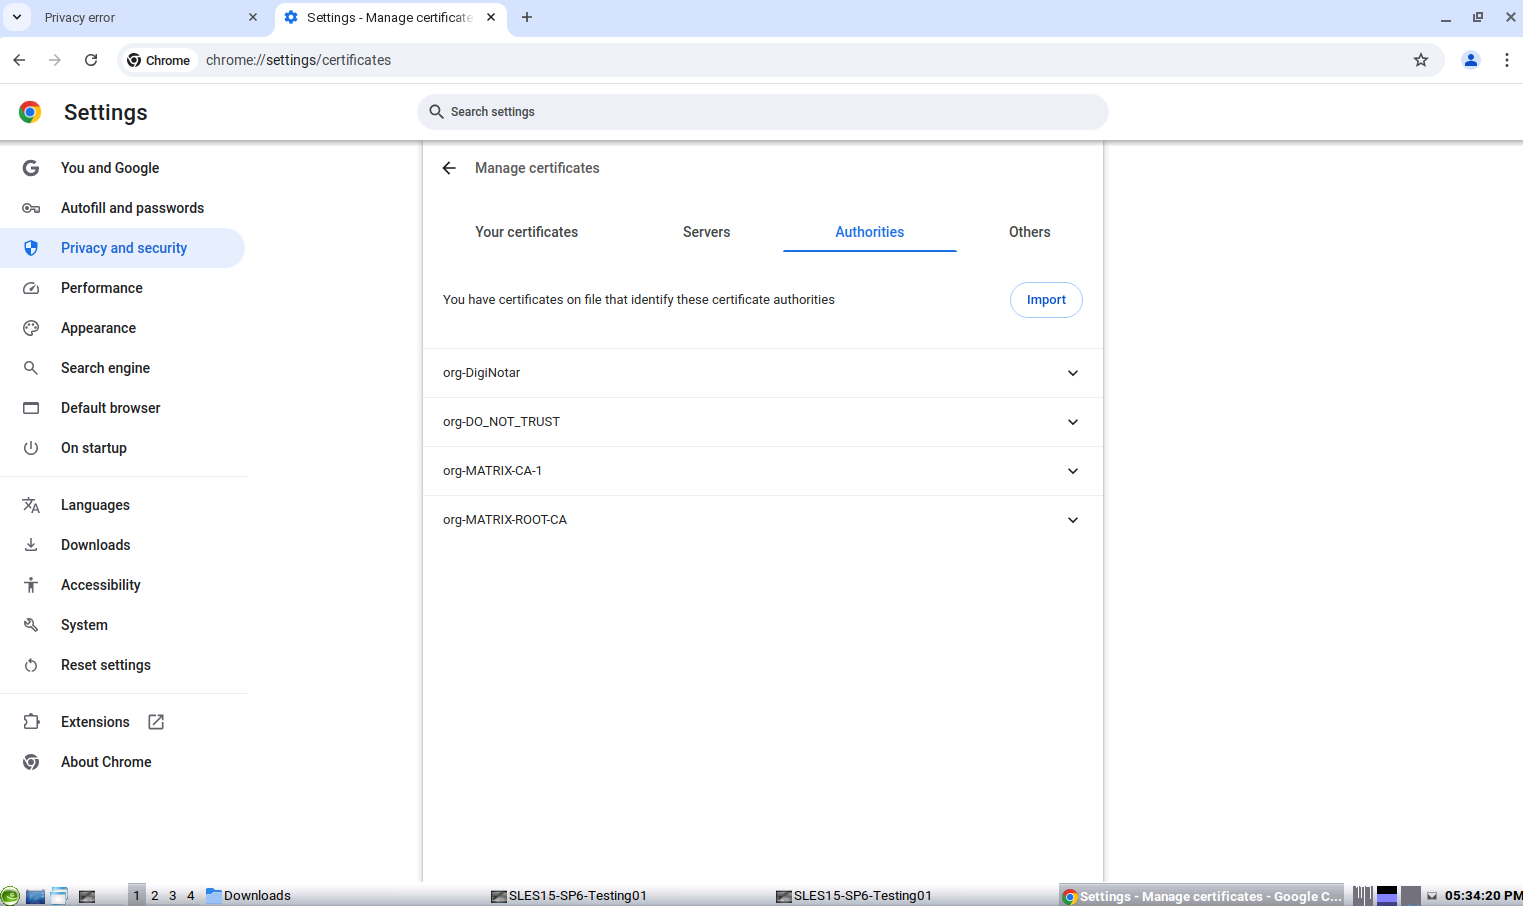
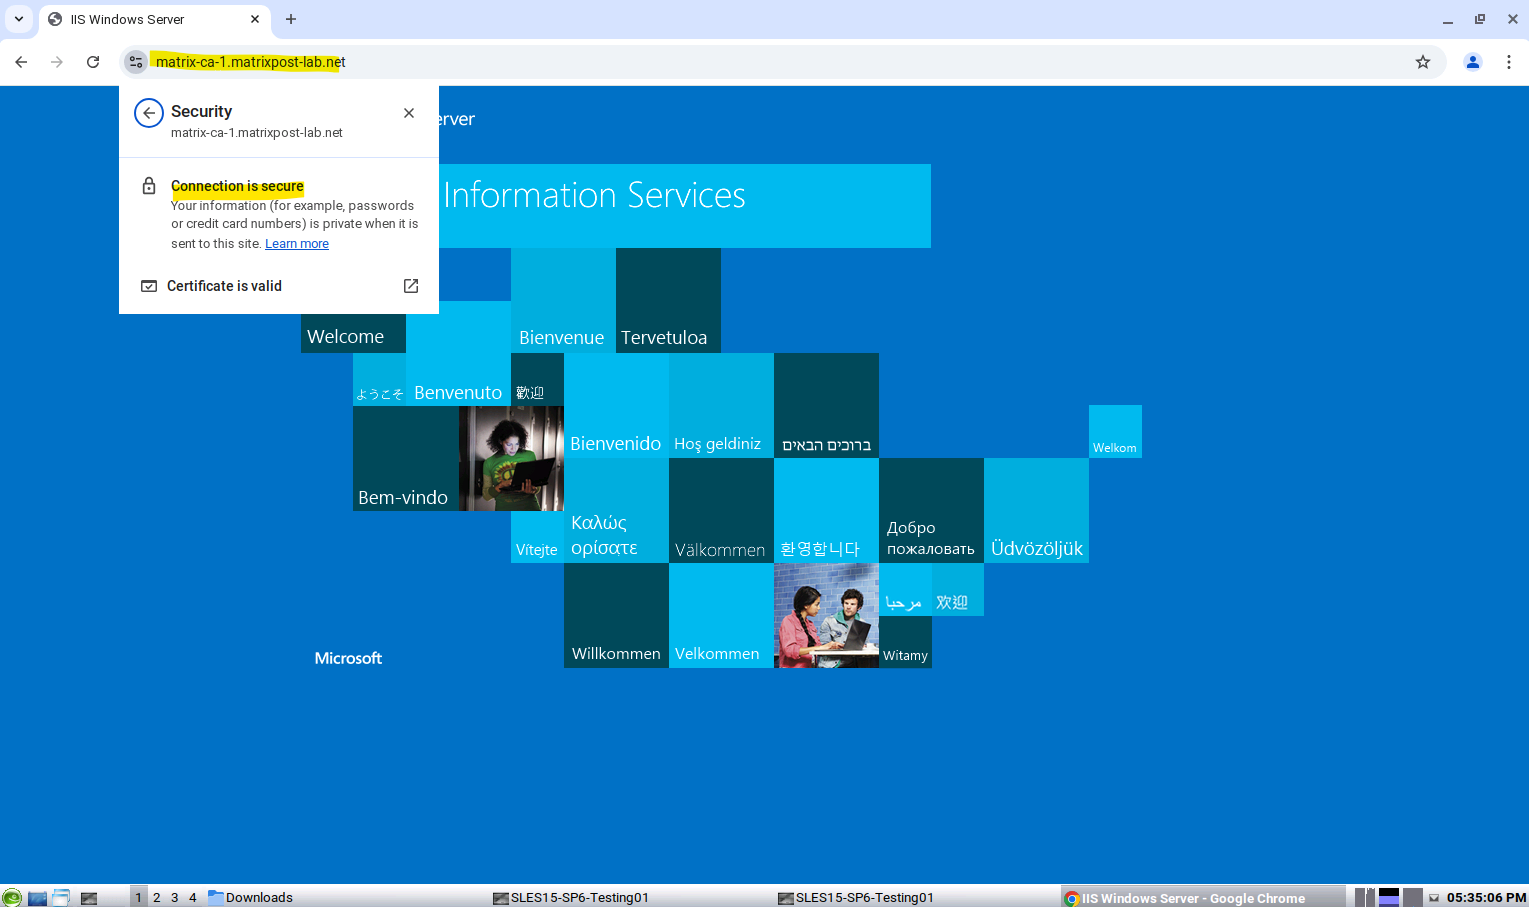
Die Bilder stammen aus dieser guten Anleitung von MatrixPost!
- Im “Proxmox”-Wiki gibt es einen Artikel zum Hinzufügen von Zertifikaten zum Trust-Store von Chrome.
- “Importing SSL Certificate in Internet Explorer, Google Chrome or Opera” TintanHq